With more and more people starting to create podcasts, simpler recording methods are being introduced. Content creators looking for straightforward tools to create videos are switching to Zoom for this purpose. With numerous audio and video recording settings, this tool ensures good-quality podcast recording. If you are also wondering how to record a podcast on Zoom, read this article and follow the instructions.
Part 1. Pros and Cons of Recording Podcasts on Zoom
Zoom is a great podcast recording app, but many drawbacks pull away a user. Go through the following points to explore the pros and cons of choosing this tool for recording podcasts:
Pros
![]()
-
Remote Connectivity: No matter how far you are from your podcast guest, Zoom can create stable connectivity between you. With its multiple guest option, many members can join your podcast and give their input on your topic.
-
Cost-Effective: If you have a tight budget, Zoom is an affordable podcast recording technique. In the free version, you can record multiple sessions, each being up to 40 minutes long.
-
Reliable and Secure: While recording a podcast through Zoom, your sessions will be completely secured due to the robust encryption features. Additionally, this platform offers built-in storage and local backups that prevent data loss.
Cons
![]()
-
Internet Dependence: A podcast recording session on this platform requires a stable internet connection for a smooth show. Unstable connectivity can cause distortion or glitches, interrupting the recording.
-
Limited Customization: If you know how to use Zoom for podcasting, you know that this platform does not have any audio filters or effects to polish the speech in real time. Unlike other voice recorders, it lacks advanced audio controls like equalization, dynamic range control, and more.
-
Free Version Limitations: The free version of this platform offers a 40-minute session, which might not be enough for an indulgent episode.
Part 2. A Complete Guide to Recording a Podcast on Zoom
To fully benefit from the recording features of Zoom, you must understand the prerequisites of creating a podcast through this platform. Look into the following points to learn the basics of how to do a podcast on Zoom:
1. Zoom Account Setup
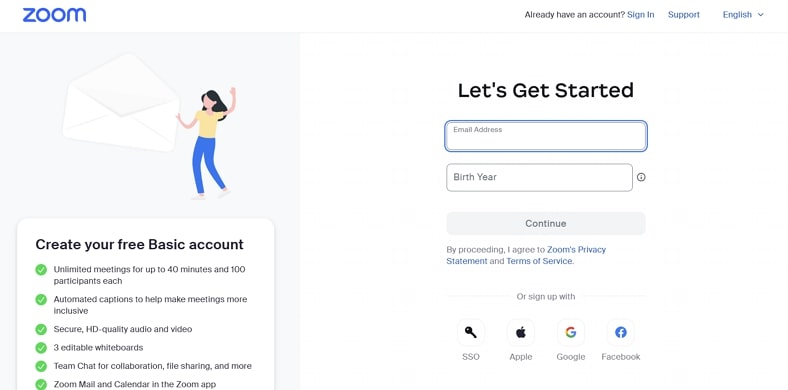
First, set up an account on Zoom by entering all the mandatory data. If you aim for a one-on-one session recording, the free version of this tool will be enough. You can subscribe to a paid plan when looking for unlimited durations of panel discussions.
2. Hardware Necessities
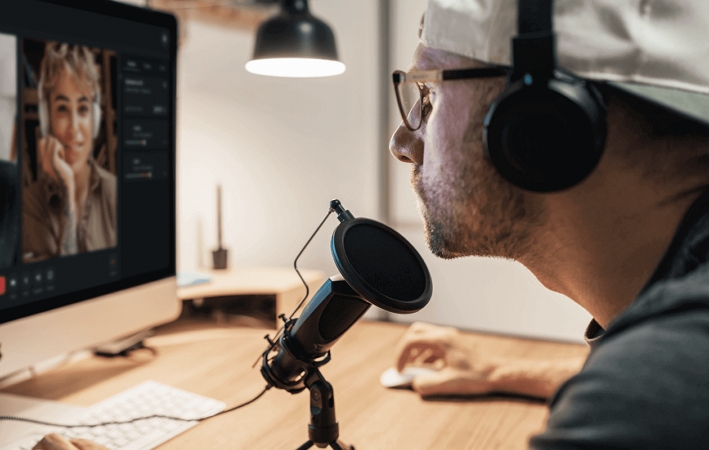
Although it is optional, you can use external microphones for enhanced audio quality. To avoid audio feedback or echo, it is best to use headphones during the sessions. Above all, use a high-quality webcam to ensure a smooth, studio-quality video recording.

3. Software Setup
A necessary step is installing the Zoom desktop application on your device. It is highly preferred to use the desktop version over the mobile phone app. Secondly, you need a robust video editor to fix the flaws left during podcast recording.
4. Create an Environment
After you have learned how to use Zoom for podcasting, you must create a well-liked environment among your target audience. You can also set the studio to align with the podcast's topic or your content niche. Another important thing to consider is choosing a quiet location for your studio, where no background noise interrupts you.
5. Built-in Audio Settings
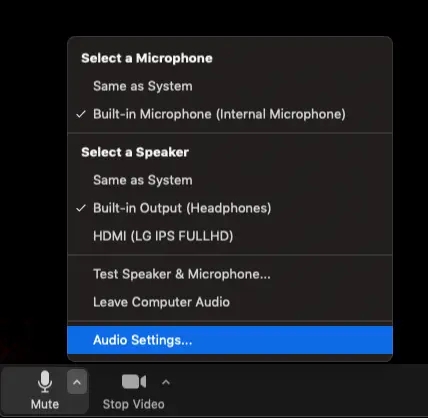
If you understand the built-in audio settings of Zoom, you can easily select the desired options for the session recording. To preserve the original quality of your microphone, you can enable the “Original Sound” option. The built-in noise suppression tool eliminates unnecessary background noise from your surroundings.
6. Content Preparation
After you have learned how to do a podcast over Zoom and prepared for enhanced audio and video quality, the next most important step is preparing the content for your podcast. Write a script for yourself and all the guests from the panel to ensure that the show goes as planned. During the session, try to revert the discussion to the topic if the show derails.
7. Test Run
The last thing to do right before recording a podcast on Zoom is having a test run. This will allow you to check if the equipment is functional. If you have faulty equipment, you can promptly fix the issues before the recording begins. Additionally, content creators can check for a stable network to avoid any glitches during the sessions.
Part 3. Best Way to Make Your Podcast Stand Out
Once the podcast is recorded, the next most important step is publicizing it on social media. With BlipCut AI Video Translator , content creators can transform their podcasts into shorter clips and make them shareable across all social media platforms. Users can choose the video durations of their choice and have their clips generated according to the type of video content they have uploaded.
After creating clips, this tool allows you to translate your podcasts into over 140 languages and reach a global audience. The podcasts are translated through editable subtitles, which can be styled later for visual appeal. To learn how to generate AI podcast clips using this AI translator, follow the steps below.
-
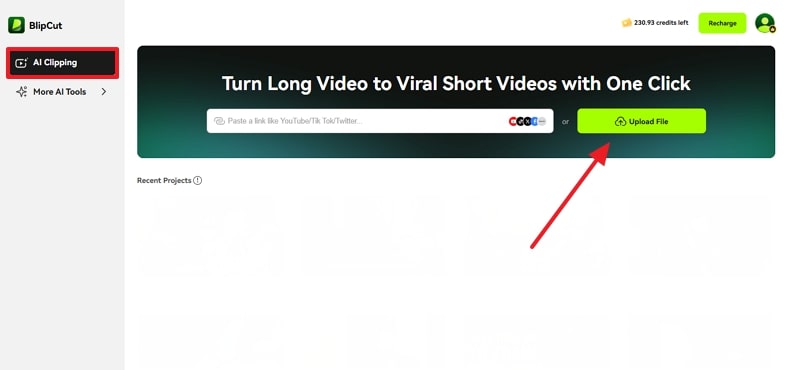
Step 1. Upload Your Entire Podcast to AI Clipping Page
As you learn how to record audio on Zoom for podcasts, open BlipCut AI Video Translator on the PC and go to the AI Clipping feature from the left panel. Afterward, click the Upload File button from this page to select the podcast you recently recorded on your device using Zoom.

-
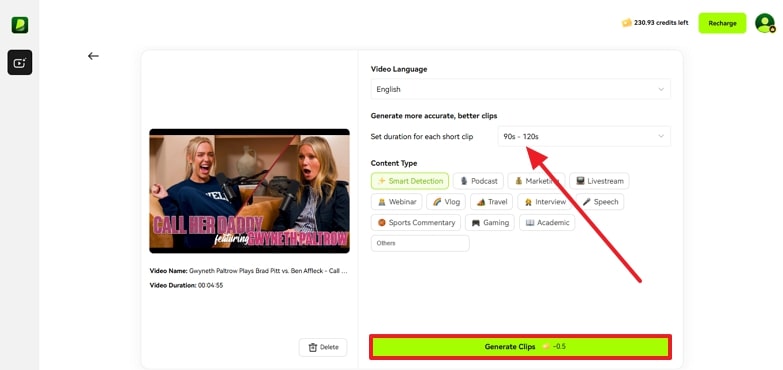
Step 2. Choose the Clip Duration to Begin the Process
When the podcast is uploaded to the next page, enter the source video language and continue. Next, enter the Set Duration For Each Clip menu and choose the desired video length from the given options. Now, you can either select the content type or let AI guess it through Smart Detection. To start the clip-generating process, press the Generate Clips option at the bottom of the window.

-
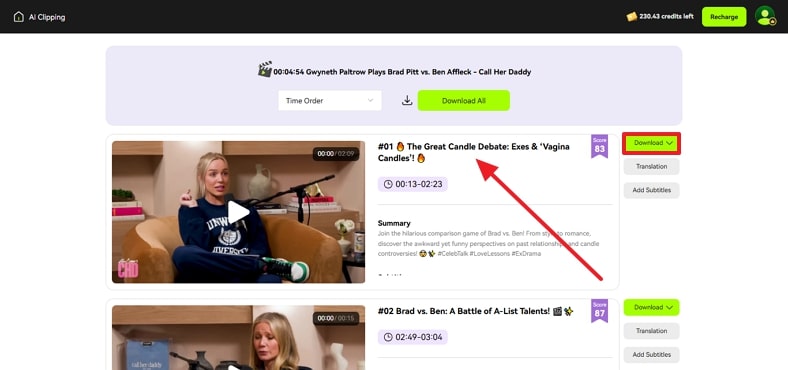
Step 3. Select and Download the Clip
After the generated clips appear on the next page, play all the clips and select the desired video clip. Next, use the Download button adjacent to it and migrate the output to your device.

-
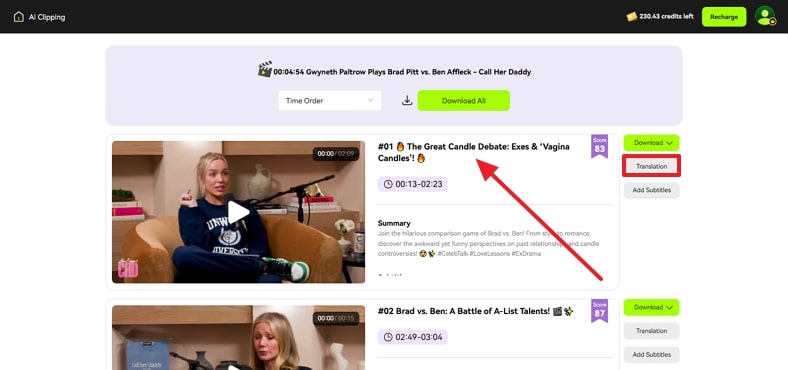
Step 4. Upload the Clip to Translate It
After downloading the clip, click Translation to translate it using the next interface. This action will direct you to the next page, where you will be able to upload the downloaded clip for translation.

-
Step 5. Select the Translation Language to Continue
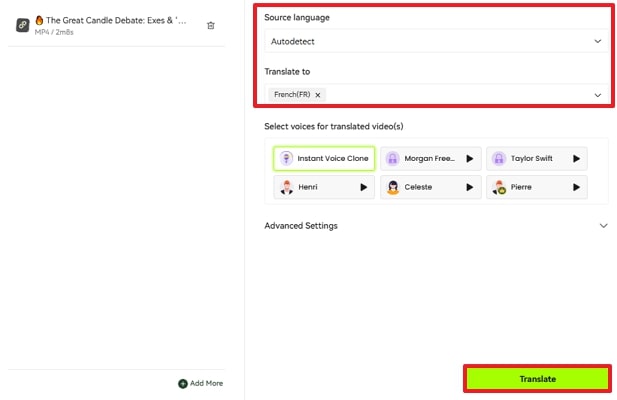
After the uploaded clip is shown on the next page, enter the Source Language or let AI guess the language by choosing Autodetect. Next, expand the Translate To menu and choose the target language for translation. To start the translation process, click Translate at the bottom of the page.

-
Step 6. Download the Translated Podcast Clip
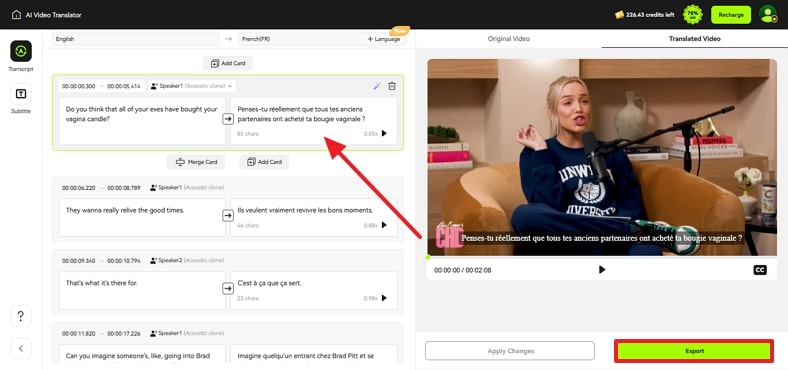
When the video transcript appears, read and edit it if you spot any inaccuracies. Next, navigate to the bottom right of the page and click the Export button to open a new window.

-
Step 7. Download the MP4 Video With Subtitles
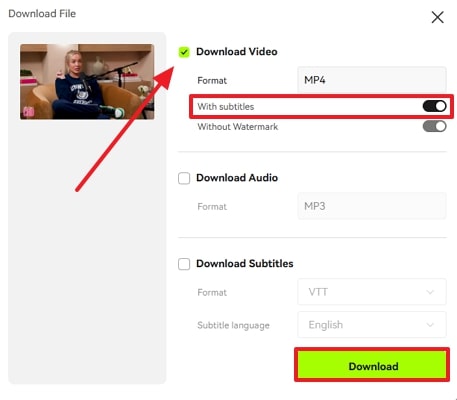
With the help of the Download File window, check the Download Video box and enable the With Subtitles option to save the subtitled video. Optionally, you can also save the audio and subtitle files separately if needed. To save all the files to your device, click the Download option to your device.

Part 4. FAQs on How To Record a Podcast on Zoom
-
Q1. How to start recording on Zoom?
A1: To start a Zoom recording, sign in to your account and head to Settings. From here, navigate to the Recording tab and toggle the Record to Computer Files option to enable it. When a verification dialogue box appears, select the Turn On option. Lastly, check the desired boxes for recording settings and click Save to apply the changes.
-
Q2. Can you create a podcast of your recorded Zoom meeting in other languages?
A2: Although Zoom has a meeting transcription option available, it is better to use BlipCut AI Video Translator to transcribe podcasts. With this tool, you can generate editable video transcripts and download them in SRT or VTT formats.
-
Q3. How do social sites prefer users to post podcasts?
A3: Social media platforms encourage posting short clips of lengthy podcasts. This can be done through BlipCut AI Video Translator, a versatile tool that generates short clips out of a long video.
-
Q4. Can you record a podcast through Zoom?
A4: It is possible to record a podcast through Zoom with or without the cameras turned on. Despite this ability, Zoom fails to provide a sustainable platform for consistent audio recording.
Conclusion
In summary, this article was all about how to record a podcast on Zoom using various techniques. After exploring the prerequisites of using this tool to record videos, we explored BlipCut AI Video Translator as an AI clip-generating tool. Once the clips are made, this platform allows users to translate them into their desired languages.
Leave a Comment
Create your review for BlipCut articles





Blake Keeley
Editor-in-Chief at BlipCut with over three years of experience, focused on new trends and AI features to keep content fresh and engaging.
(Click to rate this post)