In a world where YouTube is used for entertainment, many people access it for productive reasons. Although video transcription can be executed for all types of media, it has a key role in the accessibility of tutorial videos and educational content. Besides easing the exam preparation and other processing for you, this facility helps you keep records for future reference. Therefore, this article highlights how to get notes of YouTube transcripts on Mac.
Part 1. How to Get Notes from a YouTube Transcript on Mac?
Obtaining a video transcript serves many benefits, including a proper understanding of the content. The transcript comes with accurate timestamps, allowing you to jump to the desired video segment. If you do not need the timestamps, you can disable them to shift your entire focus on the captions alone.
Additionally, users can get notes from YouTube transcripts and copy the displayed captions to save them. The following instructions cover the detailed guide on obtaining a video transcript from YouTube on Mac.
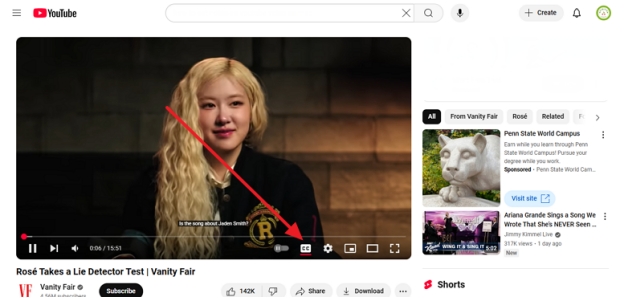
Step 1:To begin, open and play the desired video on YouTube across your Mac and check for closed captions. To do this, hover over the video and click the CC button using the bottom bar, and the cations will begin.

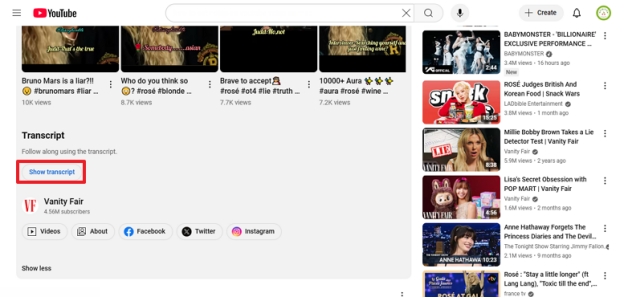
Step 2:As the video plays with the CC, scroll down and press the Show transcript button located within the video’s description.

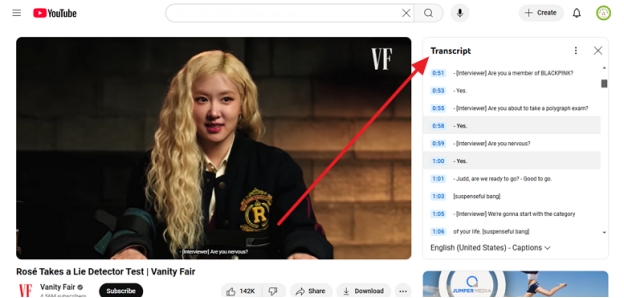
Step 3:You will be taken to the top of the page, and the video transcript will appear on the right panel. Here, you can click the desired timestamps to navigate to the respective video segment.

Part 2. How to Transcribe Voice to Text with AI?
If you are looking for a more extensive solution to download YouTube transcripts in multiple languages, BlipCut Subtitle Generator comes in handy. The tool uses the powers of AI to detect the spoken words in your video and convert them accurately into text. Moreover, the generated subs can be saved as a separate SRT or VTT file or embedded with the video itself.
Incredible Features of BlipCut Subtitle Generator
-
Lets you paste the direct link to the YouTube video for instant subtitle generation.
-
Offers a vast variety of customization options to modify the text display.
-
Translates the created captions in more than 70 languages.
-
Allows you to add multiple files simultaneously for accurate subtitle creation.
-
Generates captions from video and audio, giving you versatile options.
Guide to Generate YouTube Transcript With BlipCut
As discussed, BlipCut allows you to generate transcripts across your videos with numerous customization options. Here is a detailed step-by-step guide on how to get YouTube transcripts on Mac using this efficient tool:
Step 1. Acquire the Subtitle Generator From Official Site
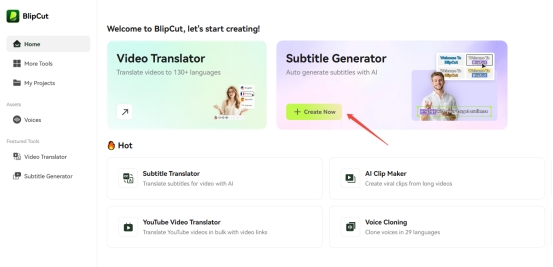
Once you have accessed the official website of BlipCut Subtitle Generator, head to the homepage and click the Create Now button across the Subtitle Generator feature.

Step 2. Paste the YouTube Video URL and Select Language
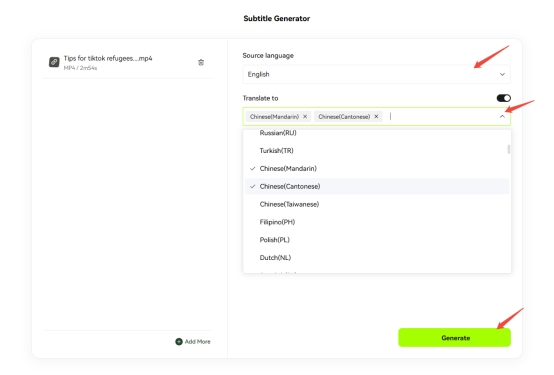
In the following interface, paste the copied link to the designated area and select the Source Language by expanding the drop-down menu. If you want to generate translations, enable the Translate To toggle and, finally, press the Generate button located at the bottom.

Step 3. Modify and Review the Transcript
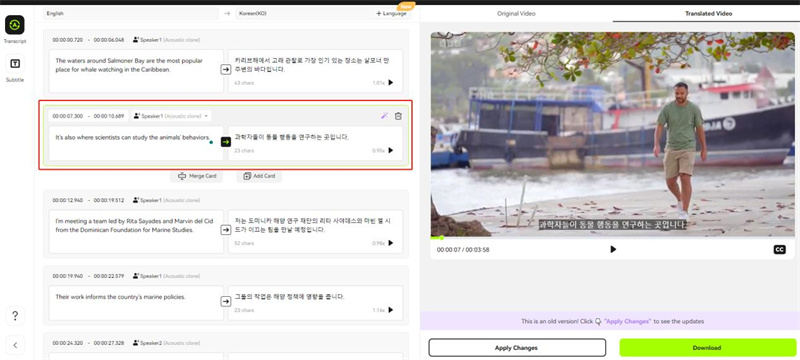
After the text is generated across the video, click on it to make any minor changes. You can click the Play button to review the text and once you are satisfied, head to the bottom of the video and press the Export button.

Step 4. Save the Generated Text as Transcript
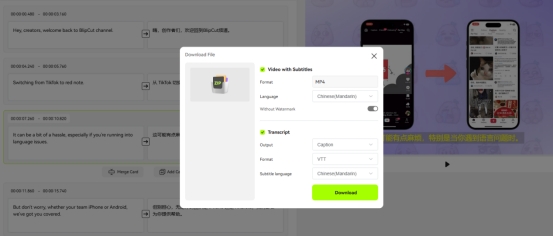
In the following small window, enable the Transcript toggle to save the transcript in SRT and VTT format. You can also opt for the Video with Subtitles option to save the text embedded into the video. Once you are done with the settings, press the Download button to successfully save the transcript to your device.

Part 3. How to Search Words in YouTube Transcript on Mac?
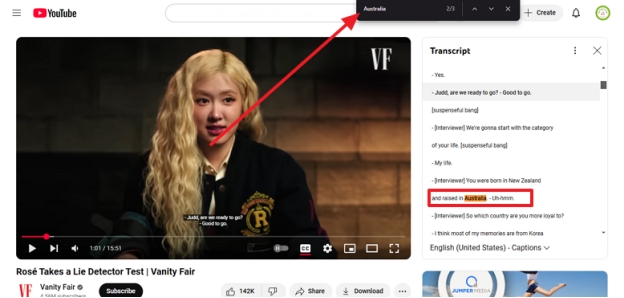
When journalists have to write about a specific YouTube interview, they can search for the desired segments of the interview by searching for keywords within the transcript. This feature allows you to navigate to multiple spots where the same word has been used in the video. To learn how to search for a YouTube transcript on a Mac device, follow the steps below:
Instructions. Start the process by opening YouTube, then access the transcript by following the above-mentioned steps. When the transcript appears in the right panel, use your Mac keyboard and use the Command + F keys. This will unveil a search bar, where you must type the desired keyword, and the searched words will be automatically highlighted wherever used in the transcript.
Conclusion
In summary, this article was a detailed guide on the methods and significance of getting YouTube transcript notes on Mac. YouTube has a built-in transcribe feature that lets you read and search for the desired segments of a video. Although this platform offers this feature, the language support is quite limited. For a more versatile transcription, you can use BlipCut Video Translator and generate video transcripts in over 140 languages.
Leave a Comment
Create your review for BlipCut articles






Blake Keeley
Editor-in-Chief at BlipCut with over three years of experience, focused on new trends and AI features to keep content fresh and engaging.
(Click to rate this post)