With the advancement in the internet, people have started looking for unique sources of entertainment. To be able to consume all types of content from all over the world, you must get it translated into your language. Not only does it make the content understandable, but it also inspires the viewer to make similar videos. Catering specifically to the Indian audience, this article covers methods of video translation in Hindi.
Part 1. Best Way to Translate Video in Hindi Recommended
While translating a video, opt for a tool that supports the most popular languages spoken worldwide. BlipCut is a video translator that provides translation options for more than 95 different languages and caters to a global audience. To enhance the understanding of the content, you can generate dubbing in your language and enjoy the streaming experience.
After the translation has been generated, you can review it and edit it according to your needs.
Key Features Involving BlipCut
-
AI Voices: To dub the video in the languages of your preference, you can use the built-in AI voices after having the speakers in the audio recognized.
-
Voice Cloning: If the built-in voices do not satisfy you, clone your voice and use that to dub the video, adding originality.
-
Voice Changer: While translating the video to Hindi, you can include a fun element to it by applying the voice changer and transforming your voice into unique characters.
-
Subtitle Editing: If you want to translate subtitles, you can do so into 95+ languages and customize the font properties according to your choice.
Furthermore, users can download the entire video, the subtitle file, or the audio alone, depending on their requirements.
-
Step 1. Upload a File and Select Hindi as the Language of Translation
Head over to the official BlipCut website and use the Upload File button to import a video in the next window. In this window, enter the original language from the Source Language drop-down menu and the Target Language from its respective menu.

-
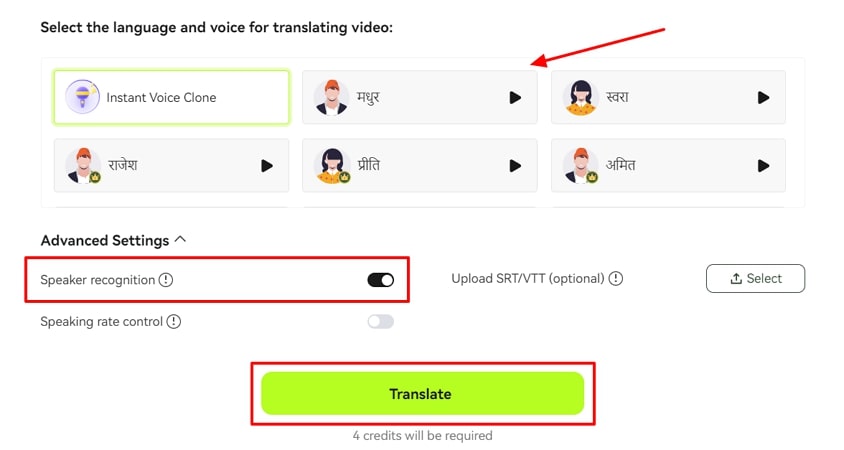
Step 2. Dub the Video by Choosing the Voices
Continue the translation process by selecting the built-in AI voices and proceed to the Advanced Settings. Toggle between the Speaker recognition feature to enable it and hit the Translate button to initiate the processing.

-
Step 3. Edit the Transcription After Reviewing It
Next, your transcript text will appear on the left part of the screen, where you can edit it. Once the editing is done, go to the right side of the screen and click the Generate Now button to proceed.

-
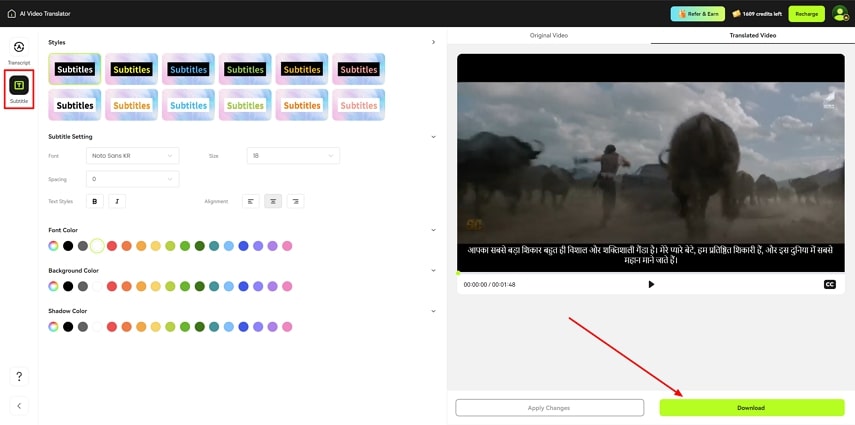
Step 4. Customize the Text and Download the File With Audio
To add a professional polish to your work, click the Subtitles option to change the font size, style, and color, or use the built-in templates to captivate the audience. You can consume the Download button to save the video with audio using the next window.

Part 2. Other 4 Ways to Translate Video into Hindi
When speaking of video translation, you must choose a platform that caters to all your needs, from text-to-speech to font customization. Take a look at the following content in order to learn about the top-notch tools that allow video translation Hindi:
1. Kapwing
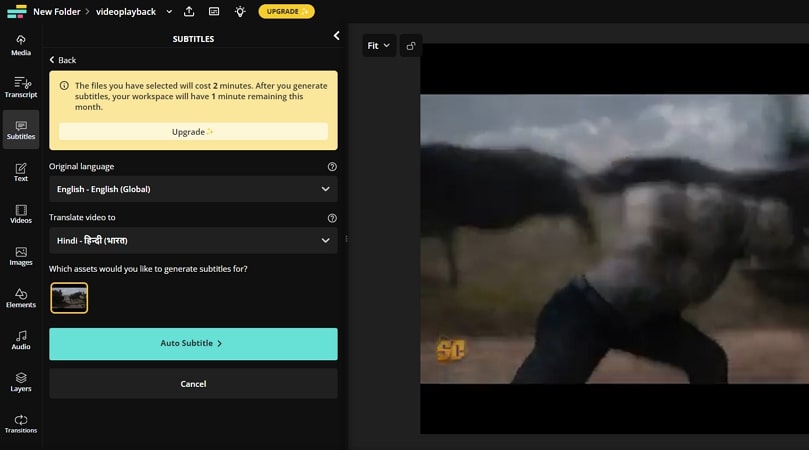
Break the language barriers as you get the transcription along with the timestamps to navigate to the desired part in the video. Manually type in the subtitles or generate automatic captions; the choice is up to you. Furthermore, you can download the SRT or VTT subtitle file after the video has been translated into Hindi.
Key Features
-
If you already have a subtitle file for the video, you can upload it and sync it with the video.
-
Users can change the alignment of the captions to enhance their readability.
-
By choosing the characters per subtitle, you can make both the video and the captions comfortably watched.
Pros
![]()
-
Other than uploading a video, you can also paste a video link for translation.
-
If you need just the subtitle file for the Hindi translation video, you can download it.
Con
![]()
-
The time limit of usage in the free version limits the user to translating short videos only.
2. Maestra
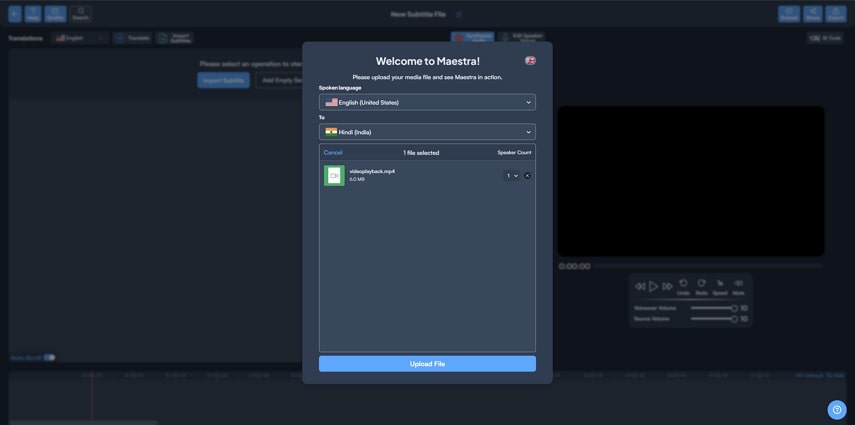
You can set the voiceover and the source volume up to 10 and enhance audibility without using a microphone. After your video has been translated, you can share it as a link and give authorized users access. To top it all off, the content can be translated into more than 125 languages, giving diversity to the audience.
Key Features
-
It also allows you to synthesize the audio to make the results better.
-
Set the speaker count as you import a video to obtain the best-quality transcription results.
-
Speed up the video up to 2 times the original pace and give viewers a faster skim through your content.
Pros
![]()
-
Translate the video to Hindi and play the specific captions from the transcript text.
-
Mute the audio in your video and post just the subtitles on your social media.
Con
![]()
-
Unlike most tools, Maestra does not allow you to customize the appearance of the captions.
3. Vidby
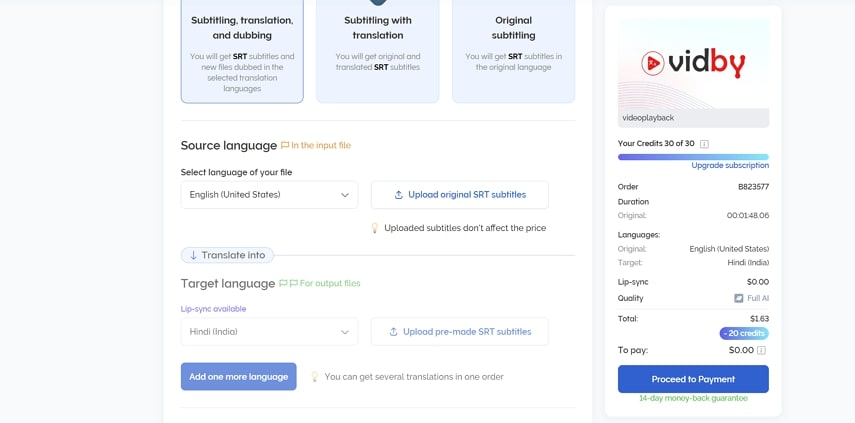
After translating a video, you can save the video or just the audio in your preferred language. Save the videos in MP4 or MKV formats and audio in MP3 or WAV file formats. Using AI, Vidby generates dubbing by removing all the background noise from your video, shifting focus to the voiceover.
Key Features
-
You can dub a video after generating subtitles in your preferred language.
-
After dubbing videos, users can enable lip-sync to align mouth movements with speech.
-
Adding multiple subtitle languages during the process allows you to target multiple ethnicities in a single video.
Pros
![]()
-
Besides importing a video from the device, you can also browse cloud storage services.
-
While your video translate to Hindi, clone your voice for the dubbing and make the video sound original.
Con
![]()
-
In the free version, you only get 30 credits, which might be insufficient for bulk videos.
4. Notta
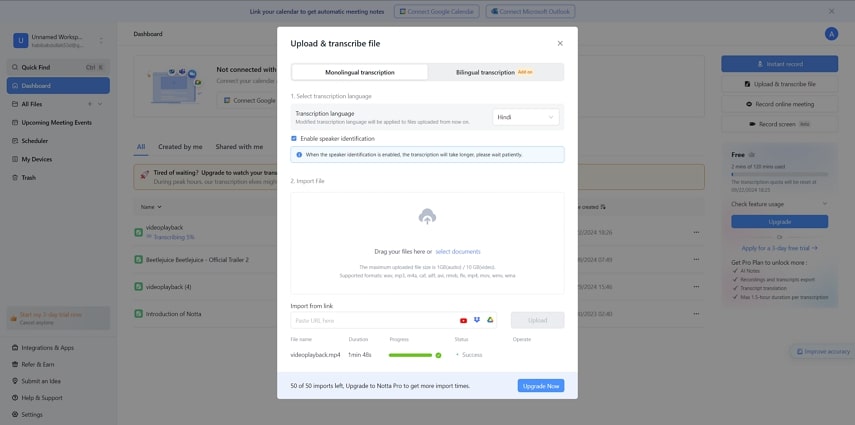
Upload a video on Notta and have your number of speakers automatically detected to get the best results. As the transcription is generated, you can bookmark and play a specific part from the transcript text. Besides this, Notta allows users to save the transcription to their cloud storage and share it instantly across multiple platforms.
Key Features
-
This tool offers users the chance to find and replace the text from transcription, easing the editing process.
-
If you want, you can download the subtitles file on your device and use it later.
-
On selected captions, you can insert images or comments to make them interactive.
Pros
![]()
-
You can upload a video file in MP4, MOV, WMA, or WMV formats.
-
Import a video of up to 10GB and video translation in Hindi and 58 other languages.
Con
![]()
-
The free trial only lasts 3 days, which may be insufficient for understanding Notta.
Part 3. Comparison Table Between These 5 Video Translations in Hindi
After exploring each tool, it is important to have a clear comparison to pick the best platform. If you want a perfect Hindi video translator, the following table will be of assistance:
| Metrics | Language Support | Text-to-Speech | Font Customization | Subtitle File Download | Subtitle File Upload |
|---|---|---|---|---|---|
| BlipCut | 90+ | ||||
| Kapwing | 60+ | ||||
| Maestra | 125+ | ||||
| Vidby | 80+ | ||||
| Notta | 58 |
Part 4. FAQs on Video Translate into Hindi
-
Q1. Is there a free tool to translate videos into Hindi?
A1: There are many free tools that offer video in Hindi translation, but BlipCut is a prominent name with diverse language support and advanced voice changing features.
-
Q2. How to convert English videos in Hindi for free?
A2: If you want to convert English videos to Hindi for free, you can head to the official BlipCut website and enjoy the video with subtitles. Other than subtitle translation, you can dub the video to enhance the understanding of a foreign movie.
-
Q3. Can I translate a video into Hindi without losing audio quality?
A3: Many tools ruin the audio and video quality during the process, but BlipCut is a safe-to-use option if you want the quality to be preserved.
Conclusion
To wrap up the discussion, let's say that translating a video is the primary action to figure out what the creator is trying to convey. After reading this article, you have learned the top methods and tools to video translate to Hindi and how to execute this process. Among all these options, BlipCut is the most prominent because of its wide language support and state-of-the-art dubbing features.
Leave a Comment
Create your review for BlipCut articles




Blake Keeley
Editor-in-Chief at BlipCut with over three years of experience, focused on new trends and AI features to keep content fresh and engaging.
(Click to rate this post)