For people who want to save their online meetings in video form for future reference and assessment, recording them is the best approach. Many of them do not know how to capture the screen activity of their devices, especially Mac devices. We will be discussing various methods on how to record a video of yourself on Mac in this article.
Part 1. Challenges in Recording Yourself on Mac
Mac users can face difficulties while using video features; below are some challenges that they face:
MacBook’s camera quality is not suitable for recording videos as it does not give high-quality results.
Sometimes, you face the challenges of audio quality; these issues cause a disturbance in audio calls.
Mac users are limited to a file format, restricting them to share screen recordings with others.
Recording equipment like external camera might be required by Mac users.
Part 2. Best Way to Record Yourself on a Mac Recommended
One of the tools that allows us to do screen recording with various customizations is BlipCut AI Video Translator. It provides users the facility of record screens with or without the camera. Furthermore, by turning the microphone on or off you can take control of recording the audio. The tool also converts the language spoken in the recording in more than 140 languages. To learn how to record yourself on Mac using this tool, read the steps mentioned below:
Step 1. Select the Video Translator Button
After opening the browser, access BlipCut AI Video Translator, select the Video Translator bar, and click on Create Now.

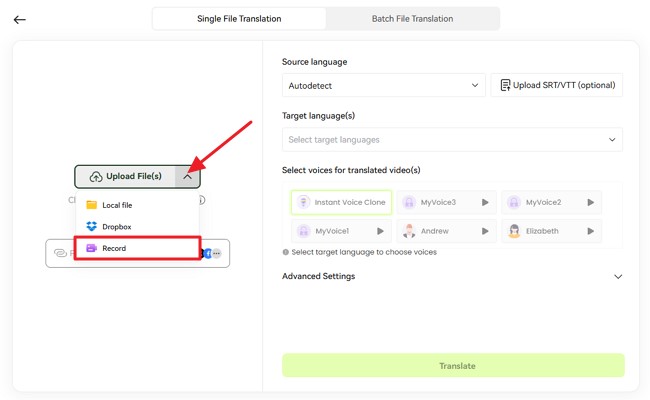
Step 2. Choose the Recording Option
Now, choose the Record button from the Upload Files drop-down menu.

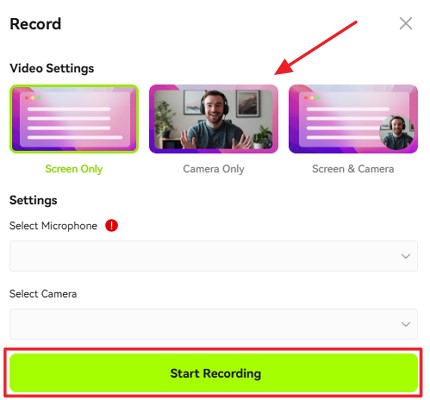
Step 3. Select Preferred Recording Options
As the Record pop-up appears, choose the type of recording you want to carry out. Then, click on the Start Recording button to initiate the procedure.

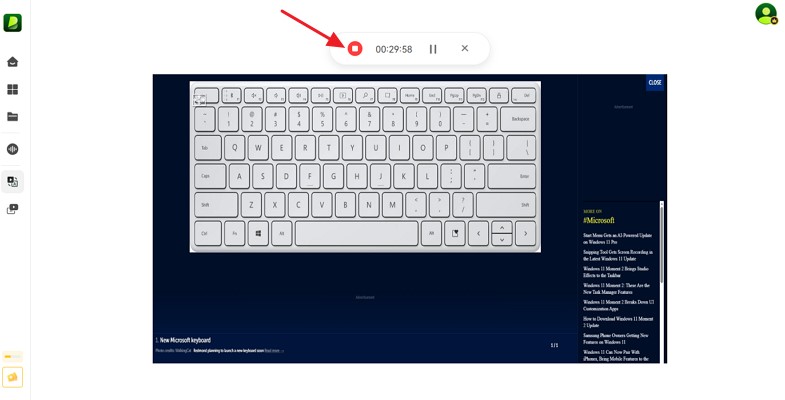
Step 4. Start and Pause the Recording
Initiate the recording by clicking the Start Recording button, and once the recording is done, press the same button to stop it. The recorded video will be automatically imported to the tool’s interface.

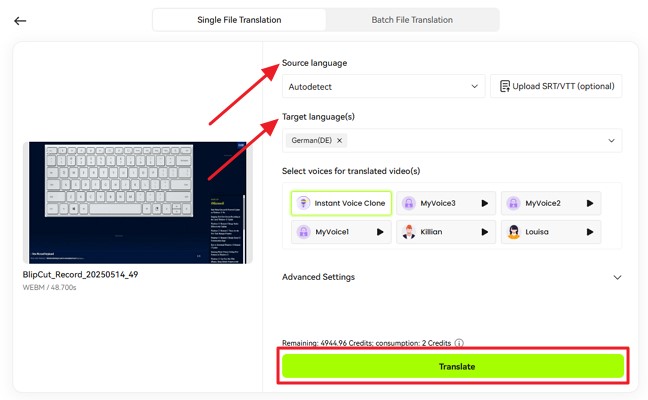
Step 5. Select the Language For Recorded Video Translation
Moving on, choose the Source Language and select the Target Language using the designated option and hit Translate.

Step 6. Export the Video in Desired File Format
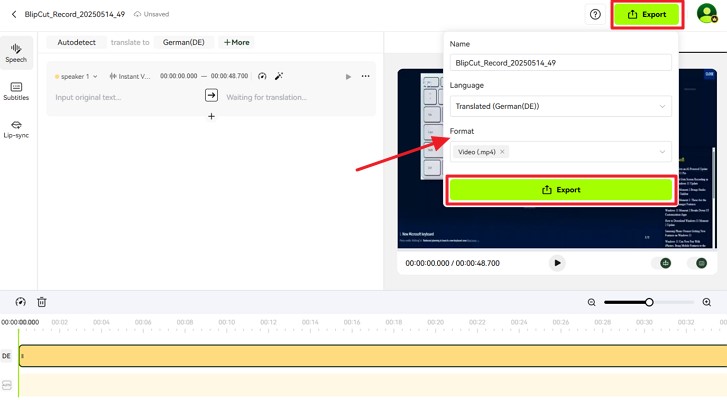
In the end, check your translated videos and make changes if required. Now, click on the Export tab from the top right corner and set file format to Export to device.

Part 3. 5 Other Methods on How to Record Yourself on a Mac
If you are looking for some other methods to know more about how to record yourself and screen on Mac, follow a few techniques that will help you:
Method 1. Using QuickTime Player for Video Recording
QuickTime Player is a built-in video recording feature of Mac that gives you the features of recordings like movies and screens. If you want to learn more about the steps of video recording, below is the guide:
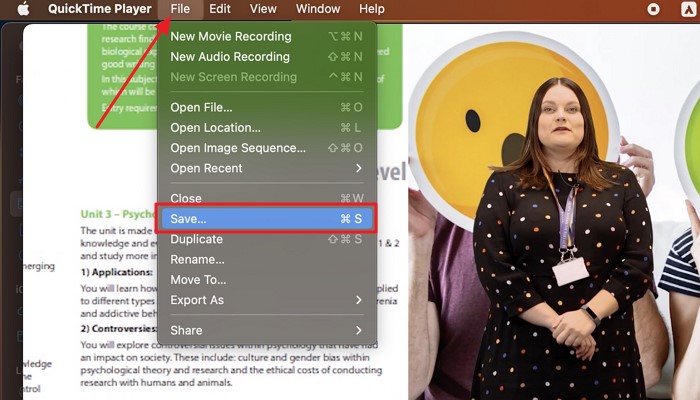
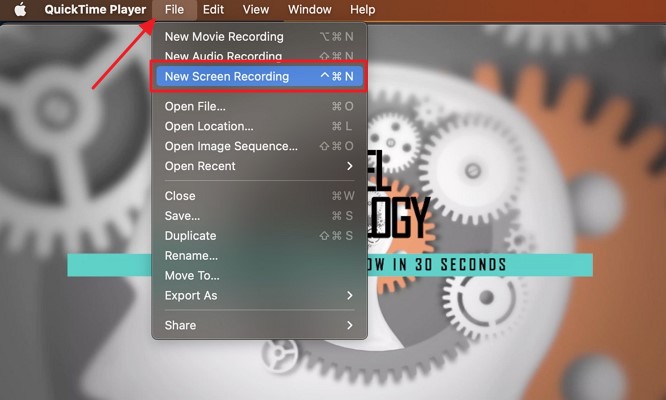
Step 1:Play your preferred video and click on the File menu and select New Screen Recording and enable the video screening.

Step 2:Click on the screen to initiate the process and to stop recording hit the Stop button on the touch bar. In the end, jump to the File tab to select the Save option from the drop-down menu.
Method 2. Using Photo Booth for Quick Video Recording
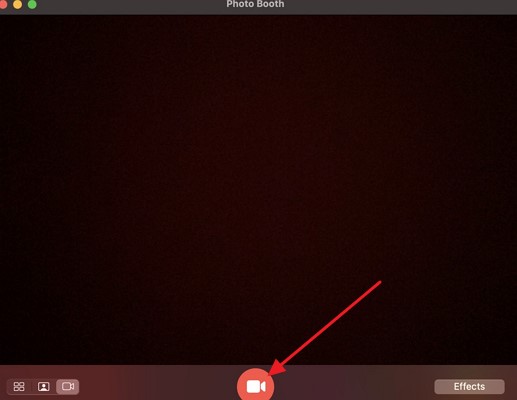
Another tool that is present on Mac is Photo Booth, through which you can not only capture a picture but also record a video. To learn how you can use the quick video recording tool, instructions are given below:
Instructions. By opening Photo Booth, the user can easily switch the photo option to quick video recording by simply pressing on the Record icon.
Method 3. Recording Screen and Yourself Simultaneously with QuickTime Player
To know about how to record your screen and yourself on Mac, the user can use QuickTime Player. This tool allows you to record both the screen and you at the same time. Following are the steps to know more about the process:
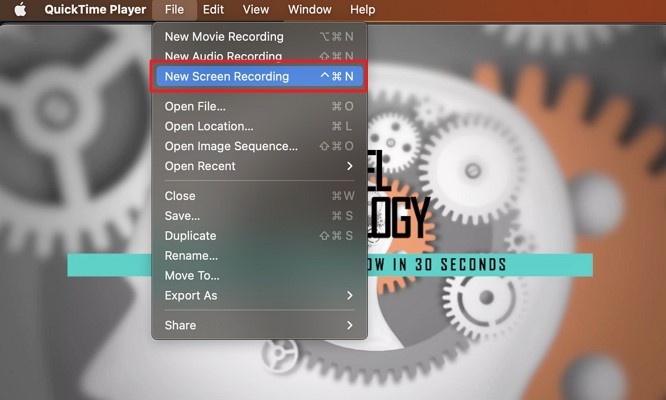
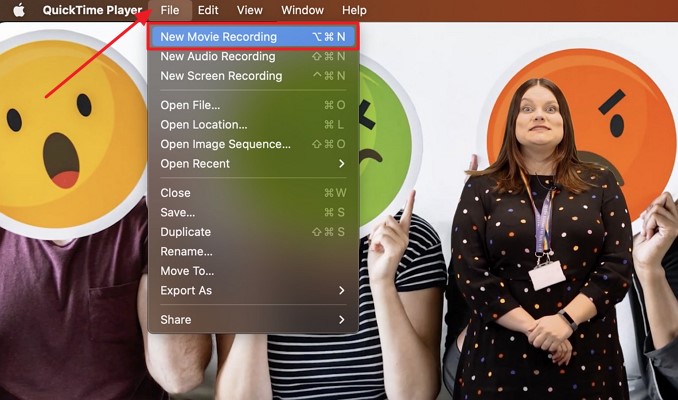
Step 1:Click on the File button from a toolbar and select the New Movie Recording and adjust it at one side of the screen.

Step 2:After that, select New Screen Recording and adjust the screen so you can use both the recordings simultaneously.
Method 4. Using OBS Studio for Advanced Recording
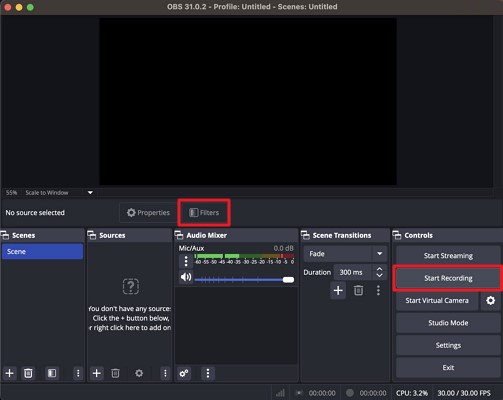
If you are looking for an advanced recording tool on Mac, you can use OBS Studio for high-quality editing. Below are the steps through which the user can edit the video and do live recordings:
Instructions. Access OBS Studio and click on the Start Recording option to start the process. You can add filters, use mixed audio, and set the duration of a video by using the advanced recording tool of OBS Studio.
Method 5. HitPaw Edimakor
It is an offline tool that is used to know how to record yourself on a Mac computer is HitPaw Edimakor. Through this tool, the user can avail different editing methods, including screen recorder, subtitle maker, and also text-to-speech converter.
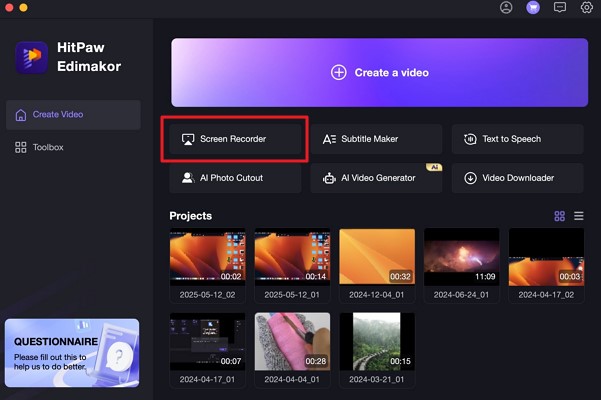
Step 1:Download and launch HitPaw Edimakor and choose Screen Recorder option from the main interface of the tool.

Step 2:Drag the cursor across the areas you want to record and hit the Red button at the top recording toolbox.

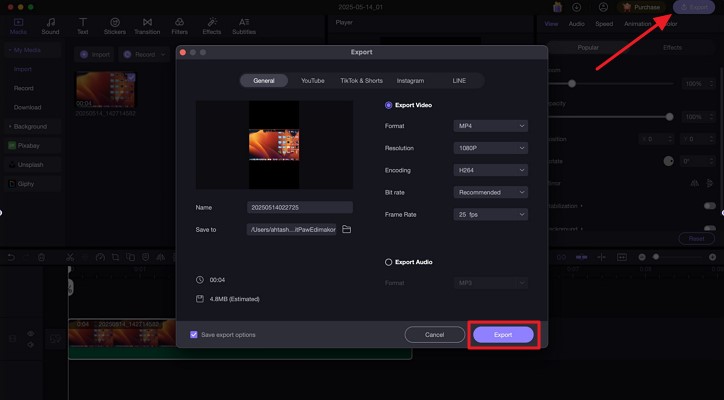
Step 3:Once you are done recording the screen, make further edits to the video and hit the Export button at the top right corner of the screen. Finally, to save the screen recording in a specific file format, set the options and click on Export.

Part 4. FAQs on How to Record Yourself on Mac
Q1. How can I record internal audio on my Mac via QuickTime Player?
A1: To do so, you need to access the New Audio Recording feature on QuickTime Player and play the audio you want to record.
Q2. Can I record my screen and webcam simultaneously using a Mac?
A2: Absolutely, with the help of QuickTime Player application on your MacBook, you can record your screen and webcam at the same time.
Q3. How can I edit my recordings on Mac?
A3: You can use QuickTime Player to edit recordings on Mac by selecting the recording, click edit and then export it and saving the file. To translate the videos, users can opt to use the BlipCut AI Video Translator tool to translate your videos.
Q4. How to record video on Mac with a blurred background?
A4: Yes, you can record video on Mac with a blurred background by using different video editing apps.
Conclusion
To sum up, this article explores how to record yourself and your screen on Mac also highlights the challenges that a person can face while recording themselves on mac. Another recommendation of a tool that is used for screen recording and video editing is BlipCut AI Video Translator. Some of the other methods of screen recording are also mentioned above for the guidance.
Leave a Comment
Create your review for BlipCut articles





Blake Keeley
Editor-in-Chief at BlipCut with over three years of experience, focused on new trends and AI features to keep content fresh and engaging.
(Click to rate this post)