The ability to convert spoken words into written text is a game-changer for Mac users, enhancing their productivity and convenience. Its built-in Speech-to-Text feature can interpret spoken language and transcribe it accurately, which helps users save time who rather dictate than type the information.
Incorporating the speech-to-text Mac functionality enables users to access a powerful tool for hands-free and multitasking transcription. This article will explore how the speech-to-text feature works and a guide for maximizing this capability on your device.
Part 1. How to Transcribe Audio to Text Live Using Dictation?
As mentioned, the dictation speech-to-text with AI macOS feature lets users dictate a document without making the effort of typing. You can set the language based on your requirements to ensure accuracy in text generation. Define the shortcut keys to get quick access to the device's dictation feature. Track the steps below to get a proper understanding of how to get access to the feature:
-
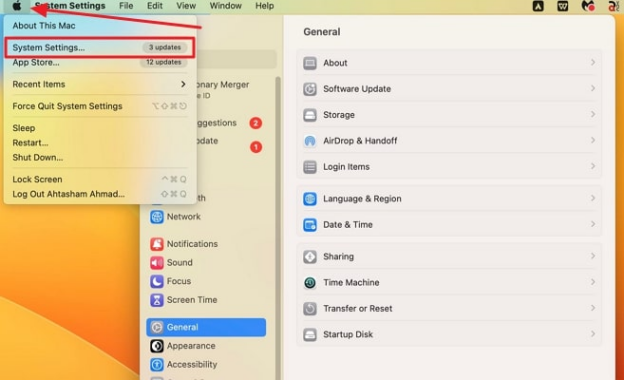
Step 1: To enable the Dictation feature on your macOS device, hit the Apple icon on the top left corner of the screen. This opens up a drop-down menu from where you need to pick the System Settings option.

-
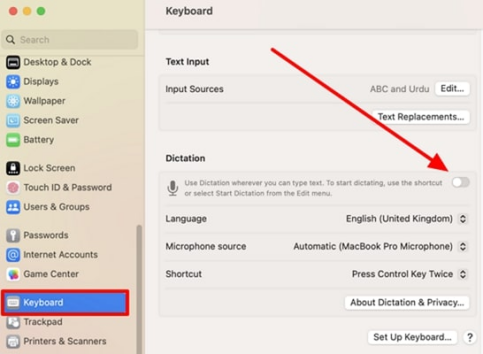
Step 2: From the left menu bar, scroll down and choose the Keyboard option to begin editing its settings. Now, navigate the Dictation section and click on the toggle button.

-
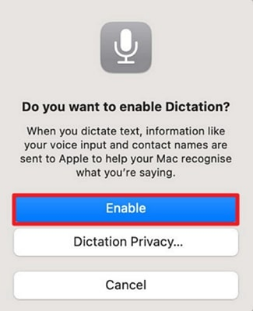
Step 3: Upon pressing the Dictation toggle button, a popup window appears. From here, select the Enable button to enable the dictation feature on your macOS keyboard.

-
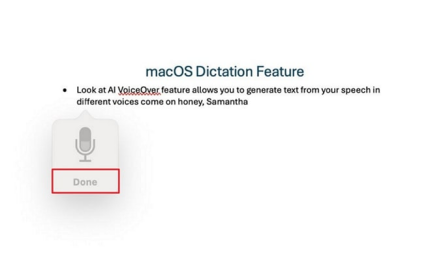
Step 4: Lastly, shift to the window where you want to perform your speech-to-text procedure. Press the specified keys on your keyboard to access the Dictation feature on your Mac. It will perform the STT process, and you can click the Done button under the microphone once you have finished speaking.

Part 2. How to Convert Speech to Text With BlipCut
Imagine you’re at a bustling conference while trying to capture the valuable insights from speakers but struggle to keep up with note-taking. With an enhanced speech-to-text feature, you can instantly transcribe spoken words into text to save time and ensure that you do not miss out on anything important. A reliable and accurate platform like BlipCut AI Video Translator ensures that you get the ability to perform this procedure without any complications.
It uses advanced AI technology to recognize different voices and transcribe text accordingly. BlipCut’s versatile speech-to-text on Mac ensures that it recognizes different languages and translates them according to your preferences.
Key Features of BlipCut
- Easily clones an exact replica of user voices on Mac to get personalized voice on any script.
- Apart from executing the speech-to-text Mac feature, BlipCut can also translate the extracted text in different languages.
- More than an online audio to text converter , BlipCut also provides a Mac version for Mac users.
- Edit, remove, add, or delete subtitles as you generate them through this Mac speech-to-text converter.
- You can generate speech from text with BlipCut AI Voiceover feature.
An Instructional Guide on BlipCut Speech-to-Text
The effective feature of AI Transcription performs speech-to-text on Mac devices without facing any complications. Go through the steps below for figuring out the steps that are important to execute speech-to-text in BlipCut:
-
Step 1. Access the Online AI Transcription Tool and Upload the Speech File
Initiate the process by going to the main webpage of BlipCut and entering the online workspace. Within this space, choose the AI Transcription tool from the left navigation bar. You can either upload a file or add a link to your speech media onto the server.
-
Step 2. Adjust the Source Language According to the Speech
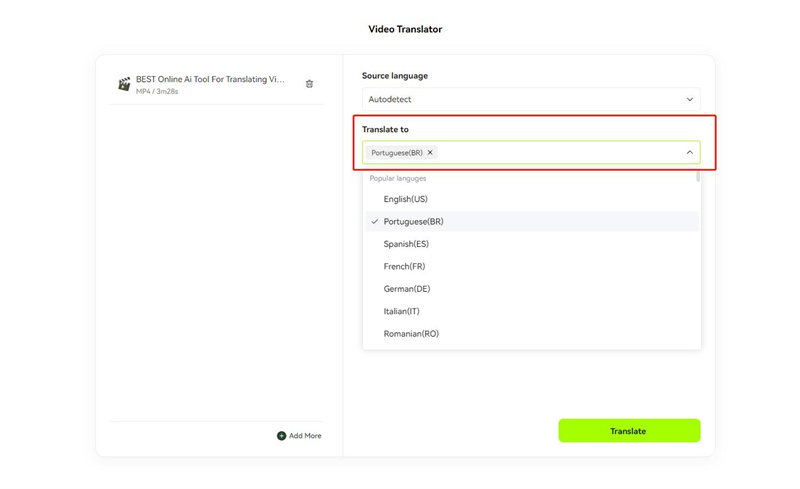
Next, select the Source Language tab and pick the autodetect option to ensure accuracy in language recognition through AI. For translating the text extracted from the video’s speech, select the Translate To language and press Translate.

-
Step 3. Manage Generated Transcription and Continue
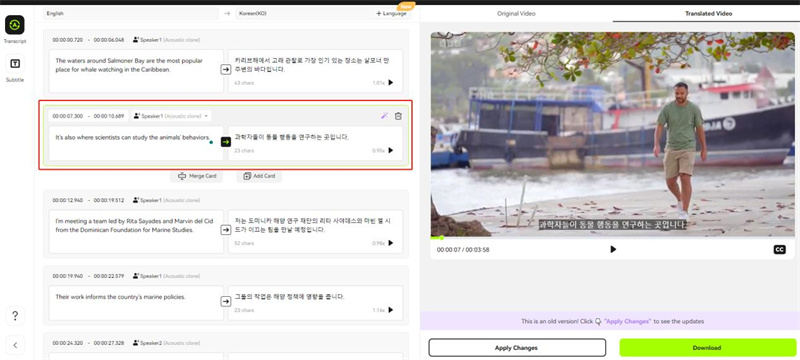
Once BlipCut AI Video Translator is done extracting text from the speech, you are shifted to the editing panel. Here, you can adjust and change the transcription cards. Moving forward, hit the Export button once you are done with the edits.

-
Step 4. Save Your Text-to-Speech Transcriptions to Your macOS
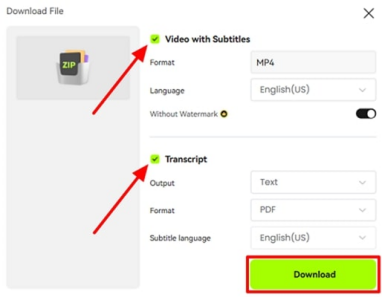
To conclude this process, a Download File dialog box opens up when clicking the Export button in the previous step. Here, tick the box of Video with Subtitles and Transcript to get the respective files as well. Click the Download button to save the files to your Mac device.

Extra Note:
In addition to the above discussion, BlipCut AI also generates text-to-speech on Mac devices. In this case scenario, you can utilize the online AI Voiceover tool to generate speech from added scripts to meet your requirements.
FAQs
-
Q1. Does Mac have built-in transcription?
A1: You can find the Dictation and Voice Control feature for live speech-to-text in Mac. However, these features lack the accuracy offered by BlipCut while transcribing.
-
Q2. How to transcribe video to text on Mac?
A2: With the help of the BlipCut tool, users can easily transcribe their videos into text on their Mac devices. It also ensures that you get to add subtitles to the videos for further video enhancement and accessibility.
Conclusion
To sum up speech-to-text instead of typing on macOS, you can utilize its built-in Dictation tool to get the job done. However, a better and more effective option would be to opt for an effective and accurate AI tool, in this case, BlipCut. With the help of this tool, you can perform STT and TTS procedures in a few steps.
Leave a Comment
Create your review for BlipCut articles






Blake Keeley
Editor-in-Chief at BlipCut with over three years of experience, focused on new trends and AI features to keep content fresh and engaging.
(Click to rate this post)