In today's time of vocal freedom, people often look to create content that lets the world know their opinions. Podcasts are one way of freely expressing your thoughts and bringing about good change in the world. Before creating episodes, you must know how to start the process and what tips might be useful. The following article is a comprehensive guide to answer the question of how to record a podcast on a Mac.
Part 1. Basic Tips for Recording Podcasts on a Mac
Recording episodes on your macOS device is a good idea as it ensures good quality with minimum external accessories. To get good outcomes, you must pay attention to detail and prepare carefully. The following tips might be useful while you are recording a podcast episode using a Mac.
1. Invest in the Hardware
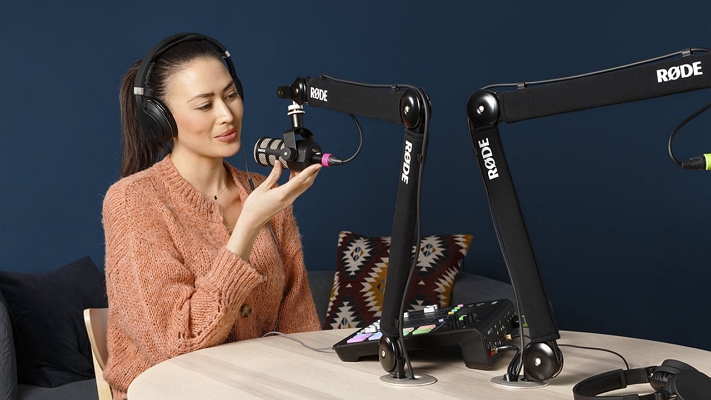
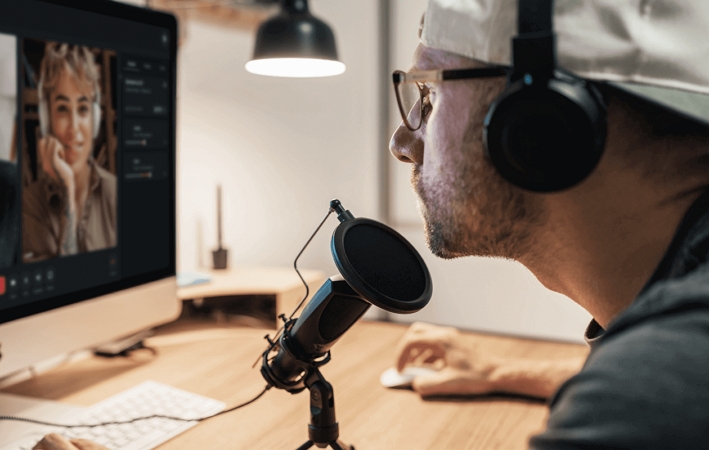
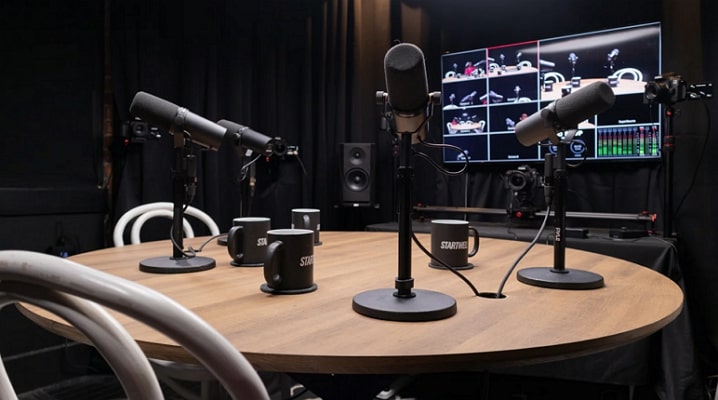
With the right tools by your side, the podcast recording process can get much easier and more professional. Therefore, investing in a high-end microphone that refines your speech and enhances the volume is essential. You must also use a pair of headphones that lets you monitor audio without causing feedback.
2. Set Up Mac Properly
After learning how to record a podcast on a MacBook, setting your device up for the occasion is important. Ensure that your device has enough space to accommodate your lengthy podcast episodes and related software. To prevent interruptions during the run, quit unnecessary applications and disable notifications.
3. Pick Good Software
From shooting to post-production tweaking, your recording must be backed with strong software. Explore the web and find reliable recording software that offers separate tracks for each speaker so you can isolate and edit them individually.
4. Create an Ambience
To master a good podcast, learning how to record a podcast on a MacBook Air and creating a relevant environment is essential. Use warm lights and neutral tones with cute props that appeal to your audience visually. Try incorporating some rugs and cushions to create a cozy environment that makes the viewer feel at home.

5. Ensure Good Recording Practices
The entire preparation goes in vain if the podcaster is not good enough during recording. During the run, ensure to be mentally present and pay full attention to the guests. Remember to speak clearly and avoid crosstalk to keep things smooth during the process.
Part 2. 3 Easy Ways to Record a Podcast on Mac
Before you record a podcast, you must fully explore all your options. Look into the following content to discover Mac's 3 top-rated podcast recording tools you can consider:
1. BlipCut AI Video Translator
The first tool. BlipCut AI Video Translator is a versatile tool that offers camera and screen recording, among many other functionalities. Using this web-based podcast recorder, users have the liberty to record screens and cameras together or separately. You can choose the desired mic and record your podcast smoothly when using multiple mics on Mac. Read the following guide and learn how to record podcasts on Mac using this AI-powered tool:
-
Step 1. Access the Recorder From the Homepage
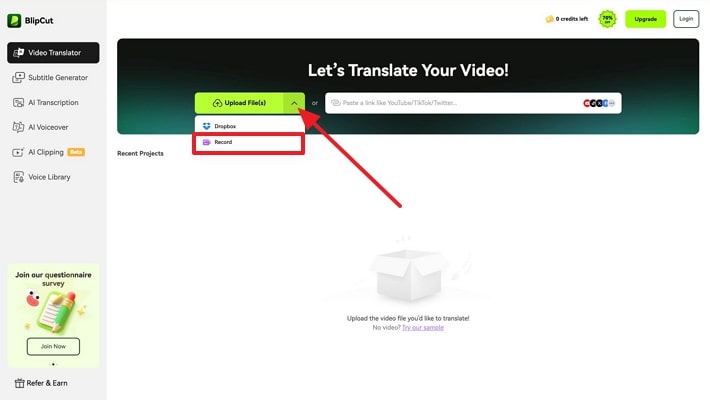
To start the process, open BlipCut AI Video Translator on your Mac and use the small drop-down arrow next to the Upload File(s) button to open a menu. Here, press Record to select the Camera Only option from the next dialogue box.

-
Step 2. Start the Recording With the Camera
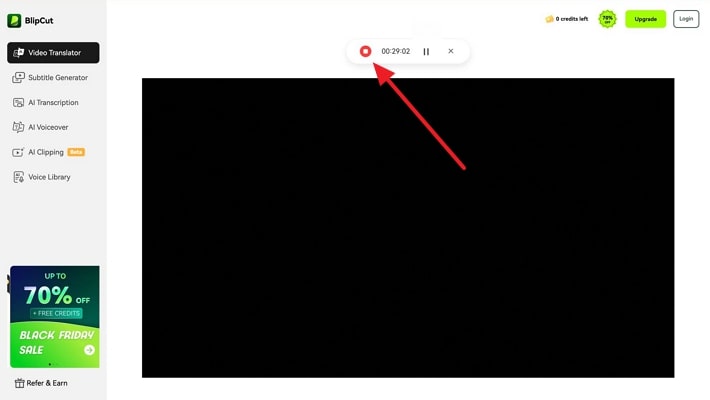
Using the next page, start the recording by pressing the Play icon from the top toolbar. When you are done recording, refer to the same toolbar and click the Finish icon to stop the recording.

-
Step 3. Select the Translation Language If Needed
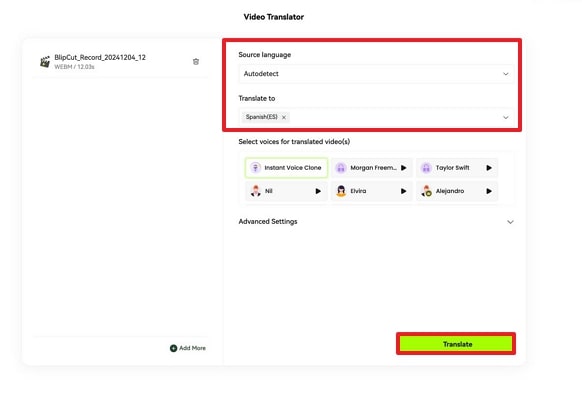
After being directed to the translation interface, navigate to the Source Language menu and choose the original video language. From the Translate To option, select the desired targeted language of your podcast if you wish to translate it into another language. Afterward, hit the Translate button at the bottom of the window to start the process.

-
Step 4. Review the Translation and Export the Translated Video
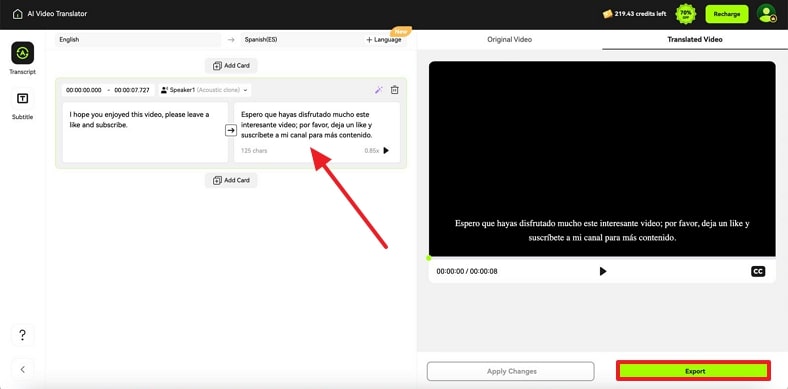
As the podcast transcript and translation appear on the next page, review the translation and edit if needed. Now, go to the bottom right of the page and click Export to open a new window.

-
Step 5. Download the Podcast on Your Device
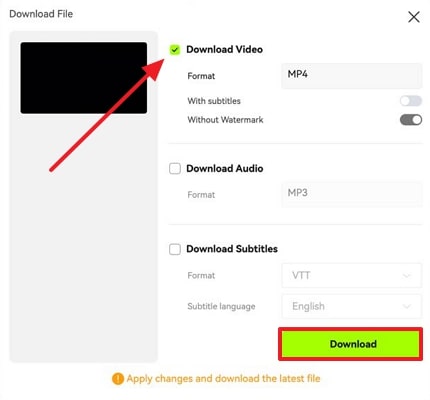
When the Download File window opens, check the Download Video box to save the video to your device. Optionally, you can download the audio and subtitle files separately by marking their respective boxes. To save the marked files to your device, use the Download button at the screen's bottom.

2. QuickTime
An accessible way to record a podcast on Mac is using its built-in screen recorder. QuickTime is best for those looking to record an audio podcast without enabling the camera. Even if you want to record an informative session, you can do so by recording images or videos for reference. Go through the steps next for a detailed tutorial on using QuickTime to record a podcast episode:
-
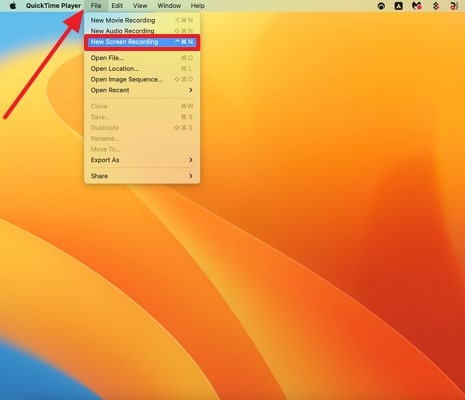
Step 1: Firstly, open QuickTime on your Mac and navigate to the top left corner of the screen to expand the File menu. From this menu, select the New Screen Recording option to start the process.

-
Step 2: When a small toolbar appears on the homepage, open the required screen and select the desired screen size for recording. Now, click the Record button from the same toolbar to start recording your screen.

-
Step 3: Once you are done recording the screen, navigate to the touchpad of your device and tap the Stop icon to access the recorded footage in a separate window.

3. Edimakor
Podcasters looking for comprehensive recording platforms can use HitPaw Edimakor on Mac. This tool allows users to record the podcast and make annotations in the recording for enhanced understanding. For high-quality results, Edimakor offers a 144 FPS screen and camera recording. To learn how to make a podcast on Mac with HitPaw Edimakor, follow the instructions below:
-
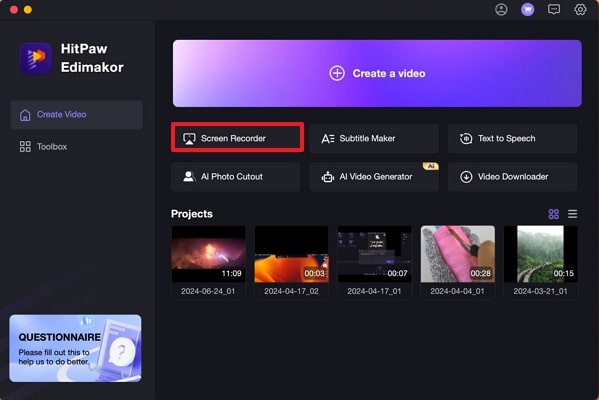
Step 1: Start recording by opening HitPaw Edimakor on your MacBook and clicking the Screen Recorder tool on the main interface.

-
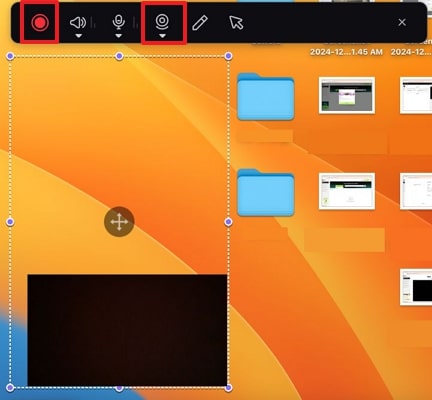
Step 2: As the small floating toolbar appears, open the desired screen on your device. Using this toolbar, enable the Webcam option and hit the Start icon to initiate the recording with the camera.

-
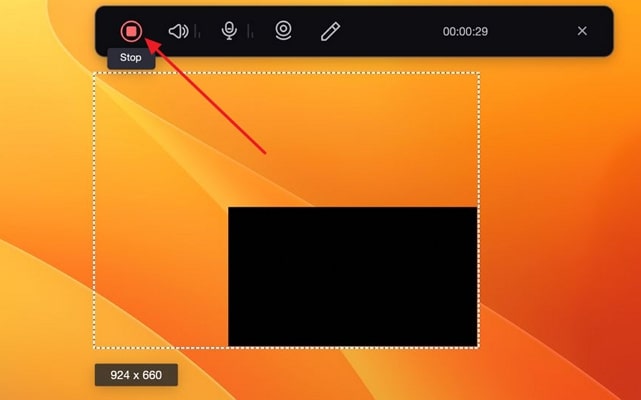
Step 3: When your podcast ends, press the Stop icon from the same toolbar and find the recently recorded podcast in the next window.

Part 3. Best Way to Clip a Podcast on Mac with AI
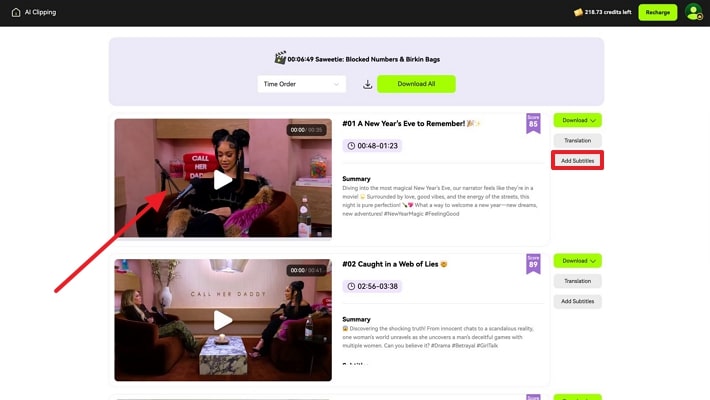
Cutting a podcast into clips is as important as recording the episode. Therefore, you need a robust clip generator such as BlipCut AI Video Translator that has functionality beyond clipping. It is an AI-driven clip generator that allows you to share the bits of an episode. These clips can be used for publicity, suspense creation, a call to action, or showcasing a glimpse of the podcast.
This clip generator liberates you by letting you choose the clip length of your choice. As you select the uploaded video type, the AI generates your clips accordingly, with relevant topics for each clip. Once you have made the clip, localize your content by generating its subtitles in over 140 languages. Anyhow, read the given guide and clarify your concepts on how to record a podcast on MacBook Pro using BlipCut AI Video Translator:
-
Step 1. Upload the Recently Recorded Podcast
To initiate the clipping process, open BlipCut AI Video Translator and head to the AI Clipping tab from the left panel. Next, use the Upload File(s) button to select the recently recorded podcast from your device.

-
Step 2. Input Clip Settings to Start
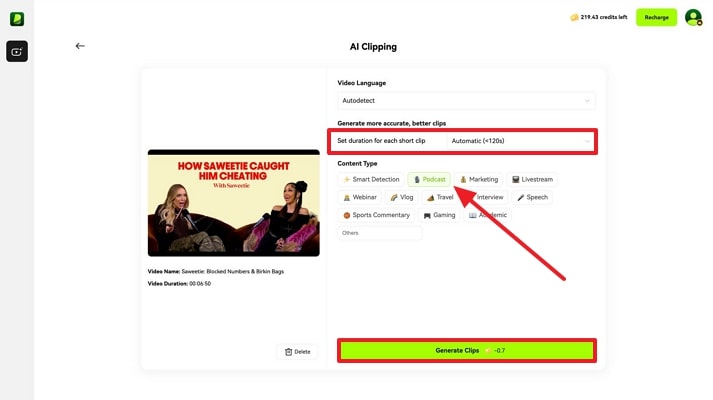
When the uploaded podcast appears on the following page, enter the video source language. Expand the next menu to set the duration for each clip to be generated. To clip the podcast, navigate to the bottom of the page and click Generate Clips .

-
Step 3. Choose and Download the Desired AI-Generated Clip
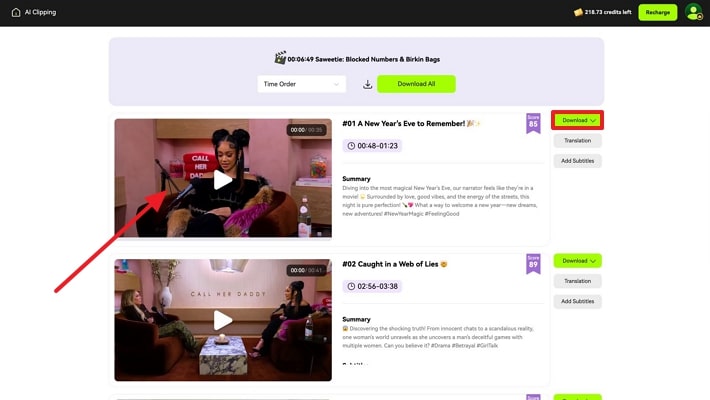
The podcast clips will appear on the following page within a few moments. After selecting the desired clip, press the Download button next to the chosen clip.

-
Step 4. Add Subtitles to Localize Your Content
After downloading the clip to your device, click the Add Subtitles button next to the selected clip to be directed to a new interface. Using this screen, you can select the desired language and other settings related to adding subtitles to the video clip.

Part 4. FAQs on How To Record a Podcast on Mac
-
Q1. Can you make a podcast in other languages?
A1: Even if you do not speak multiple languages, you can use BlipCut AI Video Translator to translate your podcast into more than 140 languages. To do this, you can either generate subtitles in the respective language or generate AI dubbing.
-
Q2. Are long podcasts preferred to be posted on social media platforms?
A2: Due to short attention spans, uploading lengthy podcasts on social media platforms is not recommended. It is better to divide the episode into shorter clips using BlipCut AI Video Translator and share the general clips on your socials.
-
Q3. Which app helps in creating the perfect podcast on Mac?
A3: To explore a tool perfect for making podcasts, you must know how to record podcasts on a MacBook. In our opinion, BlipCut AI Video Translator provides the best podcast recording platform to its users.
Conclusion
Wrapping up, this article was a detailed tutorial on how to record a podcast on Mac using various tools. After exploring each tool in detail, we concluded that BlipCut AI Video Translator is the most reliable podcast recorder for macOS devices. Upon recording the episode, you can use this platform to generate short clips out of our lengthy podcasts.
Leave a Comment
Create your review for BlipCut articles






Blake Keeley
Editor-in-Chief at BlipCut with over three years of experience, focused on new trends and AI features to keep content fresh and engaging.
(Click to rate this post)