As we all know, podcasts have become one of the most consumed types of content these days. People sit together or go online to have discussions on various topics. Content creators leverage different devices and resources to record their web broadcasts conveniently. One of the platforms Mac users can utilize to record their podcasts is GarageBand. This article discusses the top method on how to record a podcast in GarageBand conveniently.
- Part 1. What is GarageBand and Can I Use It to Record a Podcast?
- Part 2. Detailed Guide on How To Record a Podcast on GarageBand
- Part 3. How to Post-Process Podcasts in GarageBand?
-
Bonus Part. Create Proper Clips of Your Recorded Podcasts with AI
HOT
- Part 5. FAQs on How To Record a Podcast in GarageBand
Part 1. What is GarageBand and Can I Use It to Record a Podcast?
The tool is an audio workstation developed by Apple and utilized across Mac and iOS devices. It is known for offering a variety of features to produce music and edit sound effects. Users can create high-quality audio content with minimal effort through this tool’s built-in virtual instruments.
When it comes to recording a podcast, GarageBand is an excellent option since it captures and edits audio shows. You can record multiple tracks using a microphone or a pre-recorded clip. Features like cutting and trimming recorded tracks are provided to streamline post-production editing. Moreover, the tool offers an intuitive interface with a real-time visual representation as audio waveforms, especially for people learning how to create a podcast on GarageBand.
Part 2. Detailed Guide on How To Record a Podcast on GarageBand
As discussed, GarageBand offers various functionalities to initiate recording through its interface. Mentioned below is a guide on how to use GarageBand for podcast recording:
-
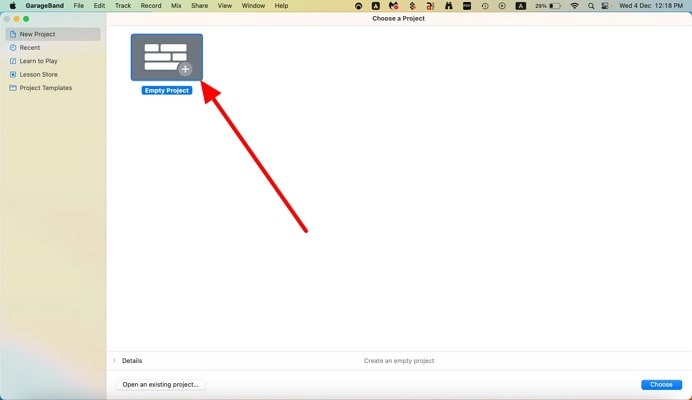
Step 1: Start by launching the tool on your MacBook and select the Empty Project option from the homepage.

-
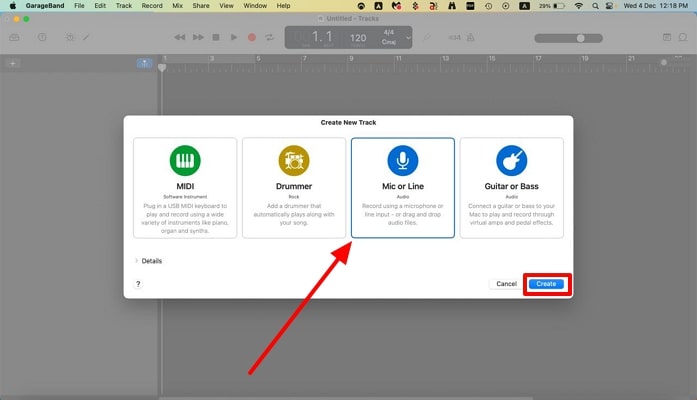
Step 2: Next, click the Mic or Line tab to specify the tool that you want to record and press the Create button to proceed forward.

-
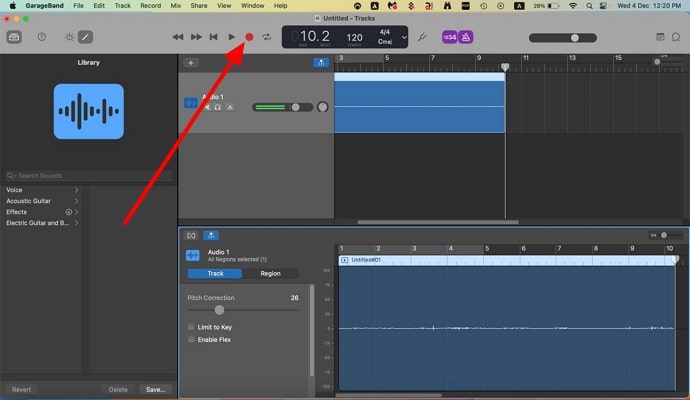
Step 3: After pressing Create, you will be navigated to the tool’s main interface, where the recording begins once you press the Red Circle button. Start speaking in your device’s microphone to let GarageBand record your podcast. Once you are done with the recording, head to the top of the recording timeline and press the same Red Circle button to stop the process.

Part 3. How to Post-Process Podcasts in GarageBand?
Once you have learned how to create a podcast on GarageBand, you can utilize the same platform to refine the recorded audio file. There are numerous features available to fine-tune and enhance the audio quality of your podcast. Thus, navigate to the guide, which explains how to edit your recorded podcast and other audio files:
-
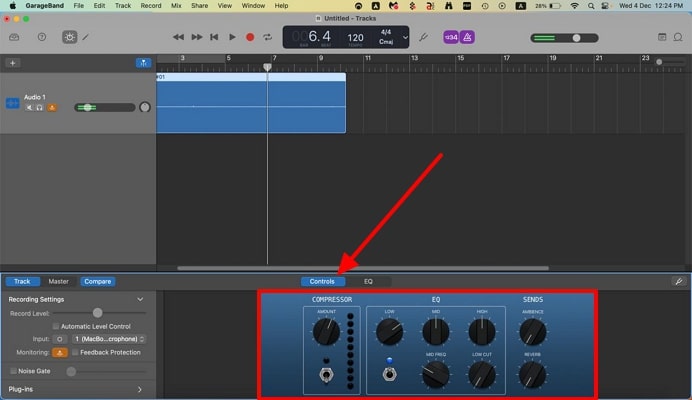
Step 1: After recording the podcast, click the audio timeline to enable the Controls option below. Here, adjust the EQ and Compressor according to your preferences and enhance the audio quality of your podcast.

-
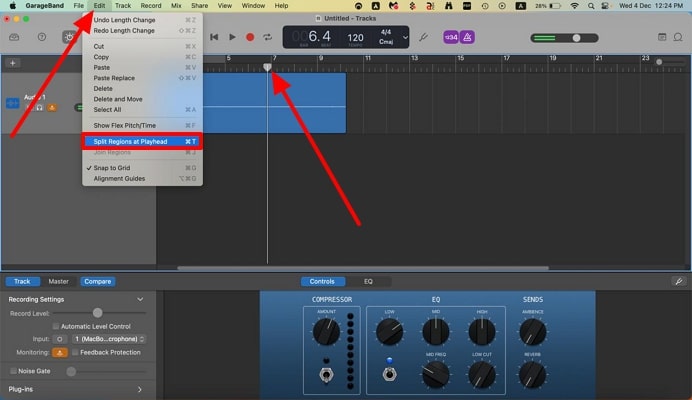
Step 2: To remove the unwanted part of the audio, bring the Playhead to the area from where you want to trim and head to the toolbar. Here, expand the Edit menu and press the Split Regions at Playhead option, separating the audio from the entire audio.

-
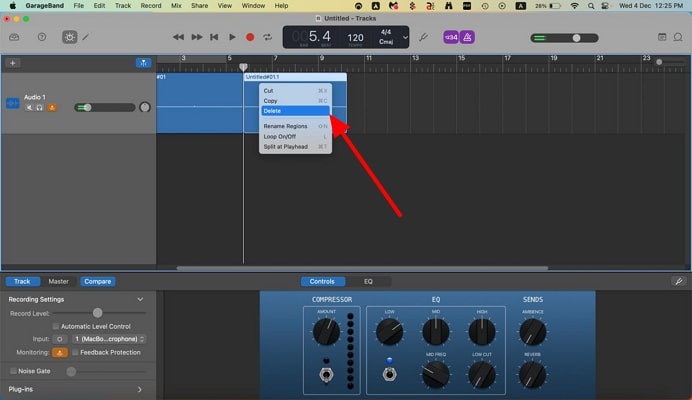
Step 3: Now, right-click the section and select Delete from the list to remove the selected part from the audio.

-
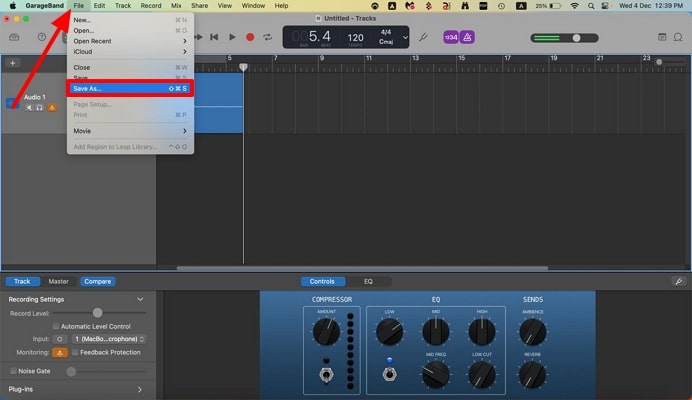
Step 4: After all the editing is successfully done, head to the toolbar and expand the File menu. From the list, choose Save As to save the podcast audio to your MacBook.

Bonus Part. Create Proper Clips of Your Recorded Podcasts with AI
While there are many effective ways available to record podcasts, many creators face difficulty in making them viral. For this reason, one of the most reliable online solutions is BlipCut AI Video Translator . This advanced platform uses artificial intelligence to capture the highlights and key moments in your video podcasts and generate short clips across them. These clips contain titles and summaries and have the potential to go viral to boost your engagement on social media.
The feature that makes this tool the ultimate platform for clip generation is that it lets you generate translations for the created short clips in more than 140 languages. Moreover, users get the ability to add accurate automated captions to their videos. Read the steps below to learn how to edit a podcast using BlipCut AI Video Translator:
-
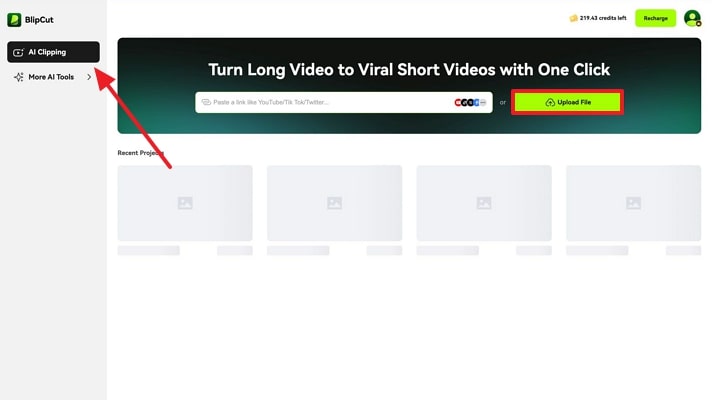
Step 1. Start by Uploading Your Podcast To the Tool’s interface
Once you have accessed the official website of BlipCut AI Video Translator, acquire the AI Clipping feature and upload your video podcast using the Upload File button.

-
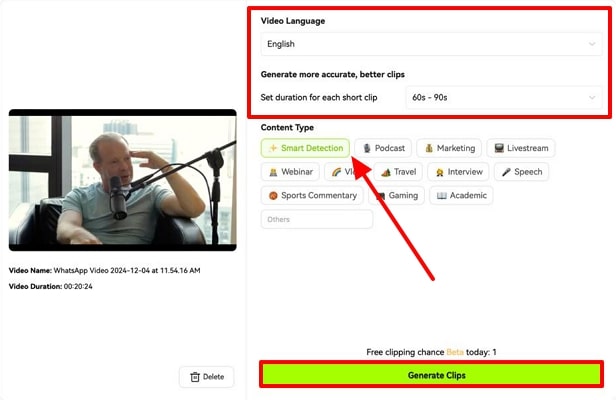
Step 2. Specify Language and Other Attributes
In the following interface, select the Video Language as English by opening the drop-down menu. Next, choose the length of each clip from the provided options and specify the type of content or let the tool analyze using AI. Once the selections are made, click the Generate Clips button located below.

-
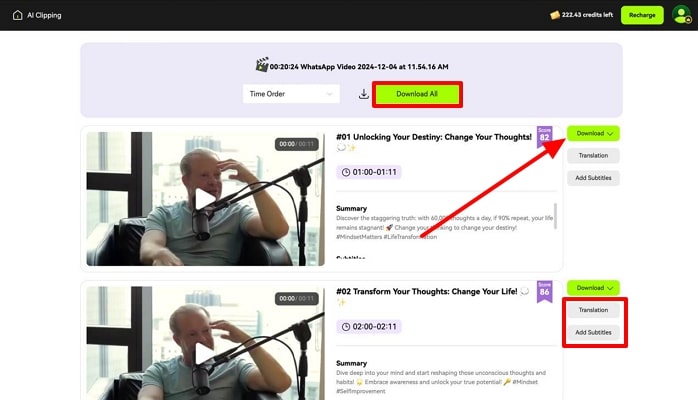
Step 3. Review and Download Generated Podcast Clips
Once the clips with titles and summaries are generated in the next interface, press the Download button adjacent to each clip to save each file separately. Use the Translation button next to the clip to produce these clips in multiple languages. Moreover, insert captions to your short video using the Add Subtitles option. Finally, click the Download All button and save all the generated videos successfully to your device.

Part 5. FAQs on How To Record a Podcast in GarageBand
-
Q1. Which is better for recording podcasts, Audacity or GarageBand?
A1: GarageBand has a more intuitive interface with extended audio editing options compared to Audacity. Conversely, Audacity has a steep learning curve because of its complicated features and lacks a mobile application to record and edit audio from your smartphone.
-
Q2. How to create podcasts in different languages for different audiences?
A2: To cater to the language needs of a diverse audience, users can generate podcasts in multiple languages using BlipCut AI Video Translator. The platform offers language support for more than 140 languages, allowing users to create content according to their preferences.
-
Q3. What is the maximum recording time allowed in GarageBand?
A3: If you are learning how to use GarageBand for podcasts, you must know that the platform has a maximum recording length of 72 minutes.
Conclusion
To conclude, this article discussed the most effective solution for how to record a podcast on GarageBand. The article also suggested a resource for generating viral clips from your podcast, using BlipCut AI Video Translator. This online solution leverages AI to analyze your podcasts and generate relevant and highlighting clips across them.
Leave a Comment
Create your review for BlipCut articles



Blake Keeley
Editor-in-Chief at BlipCut with over three years of experience, focused on new trends and AI features to keep content fresh and engaging.
(Click to rate this post)